Constructing Affordable Floating Shelves: A Comprehensive Guide
Floating shelves offer a stylish and space-saving solution for displaying books, artwork, or decorative items. This guide provides detailed instructions for constructing affordable floating shelves suitable for individuals of all skill levels, from novice DIY enthusiasts to experienced craftspeople. We will explore various materials and techniques, emphasizing cost-effectiveness and aesthetic appeal.
Choosing Your Materials: A Cost-Effective Approach
The cost of your floating shelf project depends heavily on the materials selected. While high-end hardwoods can produce stunning results, they come with a significant price tag. This guide focuses on achieving a professional finish at a budget-friendly price point. Consider the following options:
Wood Selection
Pine is an excellent choice for beginners due to its affordability, ease of working with, and readily available sizes. Fir is another softwood offering similar advantages. If you desire a more robust and durable shelf, melamine-coated particleboard or MDF (medium-density fiberboard) offers a cost-effective solution with a smooth, paintable surface. While not as aesthetically pleasing as natural wood, proper finishing techniques can mask the material's texture and create a polished appearance.
Hardware Selection
The choice of hardware significantly impacts the shelf's structural integrity and aesthetic. Heavy-duty shelf brackets are crucial, especially for longer shelves or those carrying heavier items. While hidden brackets offer a cleaner, more modern aesthetic, exposed brackets can contribute to a rustic or industrial design. Consider the weight capacity of the brackets and choose accordingly. For concealed brackets, heavy-duty screws capable of holding the weight are essential.
Finishing Materials
The finishing touches can greatly enhance the appearance of your floating shelf. Wood stain adds depth and color to natural wood, while paint offers a more modern and customizable look. For protection against moisture and scratches, a clear coat sealant or polyurethane is highly recommended.
Beginner-Friendly Floating Shelf: A Step-by-Step Guide
This section details the construction of a simple, yet elegant floating shelf perfect for beginners. This design utilizes readily available materials and straightforward techniques.
Tools Required
- Measuring tape
- Pencil
- Circular saw or hand saw (if cutting wood to size)
- Drill with appropriate drill bits
- Screwdriver (Phillips head)
- Level
- Sandpaper (various grits)
- Wood glue (optional)
- Clamps (optional)
Materials Required
- One piece of pine, fir, or melamine-coated particleboard (dimensions depending on desired shelf size)
- Two heavy-duty shelf brackets (rated for the expected weight)
- Appropriate screws for the brackets and the chosen wood
- Wood stain or paint (optional)
- Clear coat sealant or polyurethane (optional)
Construction Process
- Measure and Cut: Accurately measure and cut the wood to your desired shelf dimensions. Ensure the cut is straight and clean for optimal aesthetics.
- Sanding: Smooth the edges and surfaces of the wood using sandpaper. Start with a coarser grit and gradually move to finer grits for a perfectly smooth finish.
- Bracket Placement: Mark the positions for the shelf brackets on the wall, ensuring they are level. Pre-drill pilot holes to prevent wood splitting when driving in screws. Using a level is crucial to ensure the shelf is perfectly horizontal.
- Install Brackets: Securely attach the shelf brackets to the wall using the appropriate screws. Ensure they are firmly affixed, and the screws are adequately sunk into the wall.
- Attach Shelf: Carefully position the shelf onto the installed brackets. Test the stability before proceeding. For additional stability, consider using wood glue to attach the shelf to the brackets before fully securing it.
- Finishing (Optional): Apply wood stain, paint, or a clear coat sealant according to the manufacturer’s instructions. Allow sufficient drying time between coats.
Intermediate and Advanced Techniques
For those with more experience, more complex designs and techniques are possible. These might involve concealed bracket systems, custom-cut shapes, or the incorporation of additional materials such as metal or glass.
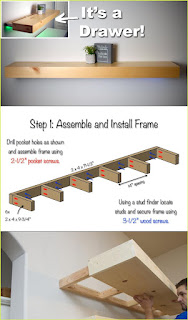
Concealed Bracket Systems
Concealed bracket systems require more precise measurements and installation. These brackets are often affixed to the underside of the shelf and into the wall, resulting in a cleaner, more minimalist appearance. Careful planning and precision are key to successful installation. This often involves using specialized brackets and potentially requiring a stud finder to ensure secure installation.
Custom Shapes and Designs
Creating custom shapes requires more advanced woodworking skills, potentially including the use of jigsaws, routers, or even CNC machines. This allows for highly individualized and creative shelf designs, such as curved shelves or shelves with intricate cutouts.
Material Combinations
Combining different materials such as wood and metal, or wood and glass, can add visual interest and complexity. This requires careful consideration of material compatibility and structural integrity. The use of adhesives and specialized fasteners might be necessary.
Safety Considerations
Safety should always be the top priority during any DIY project. Always wear appropriate safety glasses and hearing protection when using power tools. Ensure the wall anchors or screws used are appropriate for the weight of the shelf and the wall material. Never overload the shelf beyond its weight capacity. Always follow the manufacturer's instructions for all tools and materials used.
By following these guidelines, you can successfully construct affordable and aesthetically pleasing floating shelves, enhancing your home's décor and functionality. Remember, patience and attention to detail are key to achieving professional results, regardless of your skill level.


0 comments:
Post a Comment