Saturday, January 25, 2025

How to Craft a Personalized Wooden Dog Bed for Your Pet

Building the Paw-fect Personalized Wooden Dog Bed

Okay, dog lovers, let's talk about something truly special: crafting a personalized wooden dog bed for your furry friend. Forget those mass-produced, flimsy things â€" we're diving into a project that's as unique as your pup. This isn't about just building a bed; it's about building a cozy kingdom, a haven of comfort designed specifically for your beloved canine companion. Think of the pride you'll feel, knowing you built this incredible piece with your own two hands (and maybe a little help from a power drill!).

Planning Your Paw-some Project: Design & Materials

Before you grab your hammer, let's get organized. The first step is envisioning the perfect bed for your dog. Consider your dog's size, breed, and sleeping habits. A Great Dane needs a much bigger bed than a Chihuahua, right? Does your dog like to sprawl out, curl up, or burrow? This will inform your design choices.

Choosing the Right Wood

Durability is key! You want a wood that can withstand enthusiastic tail wags, playful paw scratches, and the occasional accidental chew. Cedar is a great option; it's naturally resistant to rot and insects, and its aroma is often calming for dogs. Pine is another solid choice, readily available and relatively inexpensive. If you're feeling fancy, hardwoods like oak or maple offer superior strength and a beautiful finish, though they're more expensive.

Design Considerations: Size and Style

Let's talk dimensions. Measure your dog from nose to tail and add a few extra inches for comfort. Consider the bed's height; will your dog need help getting in and out? A lower profile might be best for older or smaller dogs. As for style, the world's your oyster! You can create a simple, rustic design, a sleek and modern bed, or even something whimsical and fun. Sketch out a few ideas; you can even find inspiration online!

Here are a few style ideas to get your creative juices flowing:

  • Classic Raised Platform: Simple, sturdy, and easy to build.
  • Cozy Dog House Bed: Offers extra privacy and warmth.
  • Built-in Bed: Perfect for integrating into a dog-friendly space or nook.
  • Modern Minimalist Bed: Sleek lines and simple construction.

Gathering Your Tools & Materials

Once you have your design finalized, it's time to gather your supplies. This might seem overwhelming at first, but don't worry, we'll break it down.

Essential Tools

  • Measuring tape: Accuracy is key!
  • Saw (circular saw or hand saw): To cut your wood.
  • Drill: For creating pilot holes and assembling the bed.
  • Screwdriver bits: Match your screws.
  • Wood glue: For extra strength and stability.
  • Clamps: To hold pieces together while the glue dries.
  • Sandpaper (various grits): For smoothing the wood.
  • Safety glasses and ear protection: Always prioritize safety!

Materials List (Example for a simple platform bed):

  • Wood planks: Based on your chosen dimensions and design.
  • Wood screws: Appropriate length and type for your wood.
  • Dog bed cushion or mattress: Choose a durable, washable option.
  • Wood stain or paint (optional): To protect the wood and add a personal touch.
  • Polyurethane or sealant (optional): For extra protection against moisture.

Building Your Dog's Dream Bed: A Step-by-Step Guide

This part is where the fun truly begins! Remember, this is a general guide. Adjust the steps based on your chosen design.

Cutting the Wood

Carefully measure and cut your wood planks according to your design plans. Use a saw guide to ensure straight, clean cuts. Safety first!

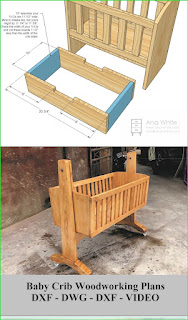
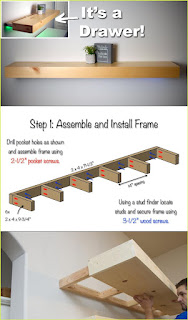
Assembling the Frame

Use wood glue and screws to assemble the frame of your dog bed. Pre-drill pilot holes to prevent the wood from splitting. Clamp the pieces together while the glue dries for a strong bond.

Sanding and Finishing

Once the glue is dry, sand all surfaces smooth, starting with coarser grit sandpaper and gradually moving to finer grits. This ensures a comfortable and splinter-free bed for your dog. Apply stain, paint, or sealant if desired, following the manufacturer’s instructions.

Adding the Cushion

Finally, add your chosen dog bed cushion or mattress. You can secure it with straps, Velcro, or simply let it rest comfortably within the frame.

Personalizing Your Creation: Adding a Special Touch

Now for the fun part! Let's make this bed truly unique. Consider adding these personal touches:

  • Engraving your dog's name: A simple but meaningful addition.
  • Adding decorative elements: Small carvings, painted designs, or stencils can add personality.
  • Using reclaimed wood: Gives the bed a rustic, eco-friendly charm.
  • Adding a built-in toy storage compartment: A clever and practical feature.

Frequently Asked Questions

Q: What type of wood is best for outdoor dog beds?

A: For outdoor beds, choose a rot-resistant wood like cedar or redwood. Be sure to apply a weather-resistant sealant to protect the wood from moisture.

Q: How can I make the bed more comfortable for older dogs?

A: Consider using a thicker, more supportive mattress. Keep the bed low to the ground to make it easier for them to get in and out. You could also add orthopedic foam padding.

Q: Can I use leftover paint or stain from other projects?

A: Yes, but make sure the paint or stain is appropriate for outdoor use if the bed will be outside. And always test a small area first to ensure you like the results.

Q: What if my dog chews on the wood?

A: While most dogs won't chew on a properly finished bed, some dogs are persistent chewers. Use non-toxic, pet-safe wood finishes and consider adding a protective layer like a chew-resistant covering if necessary.

Q: How much does it cost to build a wooden dog bed?

A: The cost varies greatly depending on the materials and design you choose. A simple platform bed can be relatively inexpensive, while more elaborate designs might cost more. However, it's often significantly cheaper than buying a comparable quality dog bed from a store.

There you have it! With a little planning, patience, and love, you can create a truly special, personalized wooden dog bed that your furry friend will adore for years to come. Happy building!

Thursday, January 23, 2025

Affordable desk woodworking plans for beginners and experts

Affordable Desk Woodworking Plans for Beginners and Experts

Building your own desk is a rewarding project, offering a personalized workspace tailored to your needs and style. Forget overpriced, mass-produced furniture; with the right plans and a little elbow grease, you can craft a beautiful, functional desk at a fraction of the cost. This guide provides detailed, affordable woodworking plans suitable for both beginners taking their first steps and seasoned experts seeking a new challenge.

Beginner-Friendly Desk Designs

For those new to woodworking, starting with a simple design is key. A basic, straightforward desk minimizes complexity while allowing you to learn essential techniques like measuring, cutting, and assembling. Focus on projects utilizing readily available materials like pine or fir, which are budget-friendly and relatively easy to work with. These woods are forgiving of minor imperfections, perfect for building confidence.

The Simple Farmhouse Desk

This classic design uses a straightforward rectangular tabletop supported by sturdy legs. Plan details often include step-by-step instructions for creating the tabletop from multiple boards, ensuring a flat, stable surface. The leg construction might involve simple mortise and tenon joints or more easily manageable techniques like pocket hole joinery, which require less precision and specialized tools. Material choices can include inexpensive pine, readily available at most home improvement stores. Finish the desk with a simple stain or paint for a rustic or modern look.

The Minimalist Floating Desk

A minimalist floating desk offers a clean, modern aesthetic. This design involves attaching a tabletop directly to the wall using sturdy brackets. Construction is relatively simple, demanding fewer cuts and joins compared to a traditional desk. The brackets themselves offer significant support, eliminating the need for complex leg constructions. Material recommendations include a lightweight yet strong material like plywood, reducing the overall cost and making the project more manageable. Choose a sleek finish to complement your space, enhancing its minimalist style.

Expert-Level Desk Projects

Experienced woodworkers can tackle more intricate and visually stunning designs. These projects often incorporate advanced joinery techniques, unique materials, and complex shapes, requiring a higher level of skill and precision. Embracing these challenges leads to truly exceptional and personalized pieces of furniture.

The Scandinavian-Inspired Desk with Drawers

This design showcases clean lines and functionality. Key features include dovetail joinery for the drawers, creating a strong and aesthetically pleasing connection. The tabletop might incorporate a unique wood species or feature contrasting wood inlays, adding a touch of elegance. Construction demands careful planning and precise execution, requiring skilled use of hand tools or advanced machinery. Using hardwoods like oak or cherry enhances both the durability and aesthetic appeal of this sophisticated piece.

The Modern L-Shaped Desk

An L-shaped desk optimizes space and provides ample workspace. Constructing this type of desk involves accurate angle cuts and precise joinery to ensure a seamless fit between the two sections. This project often utilizes advanced techniques like dado joints or more complex router work. Material selection can range from affordable plywood for the main structure to more expensive hardwoods for accent pieces, adding visual interest and durability. A clear finish showcases the beauty of the wood grain and the precision of the construction.

Tips for Keeping Costs Down

Regardless of your skill level, several strategies can help you keep your desk project affordable:

  • Source reclaimed wood: Repurpose old pallets or salvaged lumber for a unique and cost-effective solution.
  • Buy in bulk: Purchasing larger quantities of wood often results in lower per-unit costs.
  • Utilize free resources: Explore online forums and communities for free woodworking plans and tips.
  • Shop around for materials: Compare prices from different lumberyards and home improvement stores.
  • Prioritize essential tools: Invest in only the necessary tools, rather than buying every gadget on the market.

Building your own desk is a fulfilling journey, offering a tangible reward for your time and effort. By choosing the right plan and following these tips, you can craft a beautiful, functional desk that perfectly complements your style and budget.

DIY desk woodworking plans for home and office use

DIY Desk Woodworking Plans for Home and Office Use

This comprehensive guide provides detailed plans for crafting a sturdy and aesthetically pleasing desk suitable for both home and office environments. The plans cater to varying skill levels, offering options for customization and material selection. Whether you prefer a minimalist design or a more elaborate piece, this guide will equip you with the knowledge and steps necessary to construct your own bespoke desk.

I. Planning and Design Considerations

Before commencing the construction process, meticulous planning is crucial for a successful outcome. This involves defining your requirements, selecting appropriate materials, and creating detailed drawings.

A. Defining Your Needs and Preferences

Consider the following factors when determining the design of your desk:

  • Dimensions: Measure the available space and determine the ideal desk dimensions. Account for legroom, monitor placement, and potential storage needs.
  • Style: Choose a design that complements your existing décor. Options range from minimalist styles with clean lines to more traditional designs incorporating intricate details.
  • Functionality: Will your desk require drawers, shelves, or cable management solutions? Incorporate these features into your design from the outset.
  • Materials: Select materials based on budget, durability requirements, and aesthetic preferences. Common choices include hardwoods like oak and maple, softwoods like pine, and engineered wood products like plywood or MDF.

B. Creating Detailed Drawings and Plans

Detailed drawings are indispensable for accurate construction. These drawings should include:

  • Overall dimensions: Height, width, and depth of the desk.
  • Individual component dimensions: Detailed dimensions of the tabletop, legs, supports, drawers, and shelves.
  • Joint types: Specify the type of joints used (e.g., mortise and tenon, dowel joints, pocket hole screws).
  • Material list: A comprehensive list of all materials required, including wood, screws, glue, and finishing materials.
  • Assembly sequence: A step-by-step guide outlining the assembly process.

Consider using CAD software or sketching your plans by hand. Accurate measurements are paramount to ensure a well-fitting and stable desk.

II. Material Selection and Preparation

Choosing the right materials significantly influences the desk's durability, appearance, and longevity. Proper preparation of the materials is also essential for a smooth construction process.

A. Wood Selection

The choice of wood depends on your budget and aesthetic preferences. Hardwoods offer superior durability and a richer aesthetic, while softwoods are more budget-friendly. Consider the following:

  • Hardwoods: Oak, maple, cherry, walnut (offer superior strength and durability, but are more expensive).
  • Softwoods: Pine, fir, spruce (more affordable, but less durable and prone to scratches).
  • Engineered Wood: Plywood, MDF (cost-effective, consistent quality, but may lack the visual appeal of solid wood).

B. Material Preparation

Before assembling the desk, prepare the wood components as follows:

  • Cut to size: Accurately cut all components according to your detailed drawings. Use a table saw or circular saw for precise cuts.
  • Sanding: Sand all surfaces smooth to remove any imperfections. Use progressively finer grits of sandpaper for a flawless finish.
  • Edge treatment: Apply edge banding to plywood or MDF to improve appearance and durability. For solid wood, you can round over the edges for a smoother feel.

III. Desk Construction: A Step-by-Step Guide

This section outlines a general approach to desk construction. Specific steps may vary depending on your chosen design and materials.

A. Constructing the Legs and Support Frame

The legs and support frame provide the structural foundation of the desk. Common approaches include using four individual legs connected by stretchers or a more complex frame incorporating aprons. Select a method appropriate to your chosen design and skill level. Ensure all joints are securely fastened using appropriate joinery techniques and fasteners.

B. Attaching the Tabletop

The tabletop should be securely attached to the support frame. Consider using screws and wood glue for a strong and durable connection. Ensure the tabletop is level and properly aligned with the frame.

C. Adding Drawers and Shelves (Optional)

If your design includes drawers or shelves, construct these components separately and then integrate them into the desk structure. Use dovetail joints, dado joints, or other appropriate joinery techniques for robust construction. Ensure proper alignment and functionality.

D. Cable Management (Optional)

Incorporate cable management features such as grommets or wire trays to keep your workspace organized and clutter-free. Plan for these features during the initial design phase.

IV. Finishing and Refinement

The final steps involve finishing the desk to enhance its appearance and protect it from wear and tear.

A. Sanding and Preparation

Before applying any finish, thoroughly sand all surfaces to achieve a smooth finish. Use progressively finer grits of sandpaper, starting with a coarser grit and finishing with a fine grit.

B. Applying the Finish

Choose a finish that complements your wood and desired aesthetic. Options include:

  • Paint: Provides a durable and customizable finish.
  • Stain: Enhances the natural wood grain and color.
  • Polyurethane: A durable and protective clear finish.
  • Oil: Offers a natural look and feel, but requires more frequent maintenance.

Apply the finish according to the manufacturer's instructions. Multiple coats may be necessary for optimal protection and appearance.

C. Hardware Installation

Install any necessary hardware, such as drawer pulls, knobs, or shelf supports. Ensure the hardware is properly secured and functions correctly.

V. Safety Precautions

Woodworking involves the use of power tools and sharp instruments. Always prioritize safety by:

  • Wearing appropriate safety gear, including eye protection, hearing protection, and dust masks.
  • Using power tools correctly and following manufacturer's instructions.
  • Working in a well-ventilated area.
  • Keeping your workspace clean and organized.

By carefully following these plans and prioritizing safety, you can successfully construct a high-quality, customized desk that meets your specific needs and enhances your workspace.

Wednesday, January 22, 2025

DIY cabinet ideas for maximizing storage space

Maximizing Storage Space Through Ingenious DIY Cabinet Solutions

The quest for efficient storage is a universal design challenge. Clutter not only detracts from aesthetic appeal but also impacts functionality and overall well-being. While pre-fabricated cabinets offer convenience, bespoke DIY cabinet solutions provide unmatched flexibility and the opportunity for significant storage optimization. This article delves into a range of practical and innovative DIY cabinet designs, providing detailed guidance to maximize storage within any space.

Assessing Your Needs and Space Constraints

Before embarking on any DIY cabinet project, a thorough assessment of spatial constraints and storage needs is paramount. This preliminary phase involves careful measurements, identification of potential locations, and a detailed inventory of items to be stored. Consider the following crucial aspects:

Precise Measurements and Spatial Analysis

Accuracy is crucial. Utilize a measuring tape to record the exact dimensions of the intended cabinet location, including height, width, and depth. Account for any obstructions, such as pipes, electrical outlets, or structural elements. Consider the ceiling height and the overall footprint of the room to avoid overwhelming the space with excessively large cabinets.

Inventory of Storage Needs

Categorize the items destined for storage. This categorization facilitates the design of specialized compartments within the cabinet. For instance, a linen cabinet requires ample space for folded items, while a kitchen cabinet demands drawers and shelves of varying sizes to accommodate cookware, utensils, and food provisions. Consider the frequency of access for each item, placing frequently used items in easily accessible locations.

Material Selection and Budgetary Constraints

The selection of materials significantly influences both the aesthetic appeal and the structural integrity of the cabinet. Common materials include plywood, melamine-faced particleboard, and solid wood. Plywood offers a balance of strength and affordability, while solid wood provides superior durability and a luxurious aesthetic, albeit at a higher cost. Establish a realistic budget before commencing the project to ensure cost-effectiveness.

DIY Cabinet Design Strategies for Enhanced Storage

The design phase is where creativity and functionality converge. Effective cabinet design incorporates several key strategies to optimize storage capacity without compromising accessibility or aesthetics.

Maximize Vertical Space with Tall Cabinets

Utilize the vertical dimension to its full potential by constructing tall cabinets that reach the ceiling. This untapped space can accommodate numerous items, particularly in rooms with limited floor area. Consider incorporating pull-out shelves or drawers within tall cabinets to ensure easy access to items stored at higher levels.

Optimize Shelf Spacing and Depth

Strategic shelf spacing is critical for efficient storage. Adjust shelf heights to accommodate the specific items being stored, ensuring that there is no wasted space between shelves. The depth of the shelves should be carefully considered; excessively deep shelves can make accessing items at the rear difficult. Consider using pull-out shelves for deeper cabinets.

Incorporate Drawers and Pull-out Shelves

Drawers and pull-out shelves greatly enhance accessibility, especially in deep cabinets. Drawers are particularly suitable for storing smaller items, while pull-out shelves are ideal for heavier or bulkier items. Employ high-quality drawer slides and shelf runners to ensure smooth operation and longevity.

Utilize Corner Space Effectively

Corner spaces often remain underutilized. To maximize these areas, consider installing corner cabinets with rotating shelves or specialized corner drawers that allow full access to all stored items. These innovative solutions transform otherwise inaccessible spaces into valuable storage areas.

Employ Built-in Cabinetry

Built-in cabinets seamlessly integrate with the architecture of a room, optimizing space utilization. This approach is particularly effective in maximizing storage in alcoves, under staircases, or along walls. Careful planning is essential to ensure that the built-in cabinets complement the overall aesthetic of the space.

Add Dividers and Organizers

Internal dividers and organizers further enhance storage efficiency. These simple additions prevent items from shifting and toppling, maintaining order and maximizing space utilization within drawers and shelves. Custom-cut dividers can be made from wood or acrylic to fit specific storage needs.

Construction Techniques and Finishing Touches

The construction phase requires careful attention to detail and precise execution. Adherence to proper woodworking techniques ensures the longevity and stability of the cabinets.

Precise Cutting and Assembly

Utilize accurate measurements and appropriate tools for cutting and assembling cabinet components. Ensure that all joints are tight and secure to prevent instability. The use of wood glue and appropriate fasteners is crucial for durability.

Surface Preparation and Finishing

Thorough surface preparation is essential before applying any finish. Sand all surfaces to a smooth finish to ensure a uniform and professional look. Apply primer before painting or staining to enhance adhesion and improve the overall appearance.

Hardware Selection and Installation

Choose high-quality hinges, handles, and drawer slides that match the style and aesthetic of the cabinet. Proper installation of these components is essential for functionality and longevity. Consider soft-close hinges and drawer slides for a refined and quiet operation.

Beyond the Basics: Advanced DIY Cabinet Ideas

For those seeking more advanced DIY projects, several innovative ideas can further maximize storage potential.

Hidden Storage Solutions

Incorporate hidden storage compartments within walls, under stairs, or behind hinged panels. These discreet storage solutions maintain a clean and uncluttered aesthetic while providing additional space for items that are not frequently accessed.

Murphy Beds with Integrated Storage

For small spaces, a Murphy bed with built-in storage offers a space-saving solution. This design combines a fold-away bed with integrated shelving or drawers, maximizing storage in a single unit.

Customizable Modular Cabinets

Design a system of modular cabinets that can be easily reconfigured and adapted to changing needs. This approach allows for greater flexibility and adaptability over time.

In conclusion, maximizing storage space through DIY cabinet solutions offers a rewarding and cost-effective way to improve functionality and aesthetics within any home. Careful planning, meticulous execution, and innovative design strategies are essential for achieving optimal results. By following the guidelines outlined in this article, homeowners can transform underutilized spaces into efficient and stylish storage havens.

Free downloadable plans for crafting a classic cradle

Free Downloadable Plans for Crafting a Classic Cradle

The construction of a cradle, a timeless symbol of infancy and nurture, presents a rewarding challenge for the skilled woodworker. While commercially produced cradles abound, the satisfaction derived from creating a handcrafted piece, imbued with personal touches and tailored to specific needs, is unparalleled. This document provides detailed instructions and downloadable plans for constructing a classic, heirloom-quality cradle, emphasizing safety and durability throughout the process. The plans are freely available for personal use, but commercial reproduction is strictly prohibited.

I. Design Considerations and Material Selection

Before embarking on the construction process, meticulous planning is crucial. This section details the key design elements and material choices to ensure the final product is both aesthetically pleasing and structurally sound. The design presented here focuses on a traditional, gently rocking cradle, constructed primarily from hardwood.

A. Dimensions and Proportions

The cradle's dimensions are paramount to ensuring both comfort and safety. The interior length should be approximately 30 inches, allowing ample room for the infant to grow without constraint. The width should be around 18 inches, ensuring sufficient space without feeling overly spacious. The overall height of the cradle, including the rockers, should be approximately 36 inches. These dimensions can be adjusted slightly to accommodate individual preferences, but it's crucial to maintain a balance between comfort and structural integrity. Downloadable plans provide detailed diagrams with precise measurements.

B. Wood Selection and Preparation

Hardwood is the preferred material for cradle construction, owing to its strength, durability, and resistance to wear and tear. Suitable choices include oak, maple, cherry, or walnut. The wood should be properly seasoned (dried to a low moisture content) to prevent warping or cracking during and after construction. Before commencing the build, the lumber should be thoroughly inspected for knots, cracks, or other imperfections that might compromise the structural integrity. Any imperfections should be carefully addressed prior to assembly.

C. Tools and Equipment

Constructing a cradle necessitates a range of woodworking tools and equipment. Essential tools include:

  • Table saw
  • Miter saw
  • Planer
  • Jointer
  • Drill press
  • Router
  • Sanding equipment (orbital sander, hand sanding blocks)
  • Clamps (various sizes)
  • Measuring tools (tape measure, square, calipers)
  • Wood glue
  • Wood screws
  • Finish (paint, stain, varnish â€" choose non-toxic options)

The availability of these tools will influence the complexity of construction. Access to a well-equipped workshop is highly recommended.

II. Construction Process: Step-by-Step Guide

The construction process is detailed in the downloadable plans, divided into manageable stages. This section provides a general overview of the key steps involved. Detailed diagrams and measurements are available in the accompanying plans.

A. Frame Construction

The cradle's frame forms the foundational structure, providing support for the remaining components. This typically involves constructing four side panels, joined together using strong joinery techniques such as mortise and tenon joints or robust dowel joints reinforced with wood glue and screws. Precise cutting and alignment are critical to ensure the frame's squareness and stability.

B. Bottom Panel Installation

Once the frame is assembled, the bottom panel is fitted. This should be a solid piece of wood, securely attached to the frame to provide a stable base for the mattress. Ensure that the bottom panel is securely fastened, avoiding any gaps that could pose a safety hazard.

C. Rocker Attachment

The rockers are crucial for the cradle's gentle rocking motion. These are typically curved pieces of hardwood, securely attached to the bottom of the cradle's frame. Properly attached rockers ensure a smooth, controlled rocking action, without excessive movement or instability.

D. Headboard and Footboard Integration

The headboard and footboard enhance the cradle's aesthetic appeal and provide added support. These are usually decorative elements, carefully fitted and attached to the frame. Ensure that all edges are smooth and sanded to prevent any potential injury to the infant.

E. Finishing and Safety Checks

Upon completion of the assembly, thorough sanding is essential to ensure a smooth surface. Apply a child-safe finish, such as non-toxic paint, stain, or varnish. After the finish has dried, conduct a comprehensive safety check, ensuring all screws are tight, all edges are smooth, and there are no potential hazards.

III. Safety Considerations and Legal Disclaimer

Safety is paramount when constructing a cradle for an infant. The following precautions are crucial:

  • Use only high-quality, properly seasoned hardwood.
  • Ensure all joints are strong and secure.
  • Thoroughly sand all surfaces to eliminate sharp edges and splinters.
  • Use child-safe finishes, free from toxic chemicals.
  • Always supervise infants while in the cradle.
  • Never leave infants unattended in the cradle.
  • Comply with all relevant safety standards and regulations.

Disclaimer: These plans are provided for informational and educational purposes only. The author and distributors assume no liability for any injuries or damages resulting from the construction or use of this cradle. It is the user's responsibility to ensure the safe construction and use of the cradle, adhering to all safety regulations and best practices. Always supervise infants while in the cradle.

The downloadable plans include detailed diagrams, cutting lists, and assembly instructions. By carefully following these plans and prioritizing safety throughout the construction process, you can create a beautiful, functional, and safe cradle for your child, a lasting heirloom to be cherished for generations.

How to build a crib with free woodworking instructions

Building a Safe and Sturdy Crib: A Free Woodworking Project

Building a crib might seem daunting, but with careful planning and readily available free woodworking instructions, you can craft a beautiful and safe sleeping space for your little one. This project requires precision and adherence to safety standards, so take your time and enjoy the process of creating a lasting heirloom. Remember, safety is paramount; always check local safety regulations and standards before starting and during your project. This guide offers a general overview, and you should adapt it to the specific instructions you find online.

Finding Your Free Plans

The internet offers a treasure trove of free woodworking plans. Websites dedicated to DIY projects, woodworking blogs, and even some furniture retailers provide detailed blueprints and instructions. Start your search by using specific keywords like "free crib plans," "DIY baby crib plans," or "Ana White crib plans" (a popular resource). Carefully review several sets of plans to find ones that match your skill level and the type of crib you envision. Pay close attention to the materials list â€" ensuring you have access to the specified wood types and dimensions is crucial. You’ll also want to examine the intricacy of the joinery â€" simpler joinery is easier for beginners.

Gathering Your Materials and Tools

Once you've selected your plans, meticulously gather the necessary materials. Accuracy is key; purchasing the wrong size wood will significantly impact the crib's structural integrity. The plans should specify the type and quantity of wood needed, along with any hardware like screws, dowels, or specialized fasteners. Don't skimp on quality; opt for high-quality lumber designed for furniture making. For tools, you'll need a basic woodworking arsenal including:

  • Measuring tape and square
  • Circular saw or miter saw
  • Drill with various drill bits
  • Screwdriver (or impact driver)
  • Sandpaper (various grits)
  • Wood glue
  • Clamps
  • Safety glasses and hearing protection

Consider adding a planer and jointer to your tool list if you want to work with less-than-perfectly milled lumber. These power tools ensure smooth, flat surfaces for better joints and a more professional finish.

Step-by-Step Construction: Following the Plans

With materials and tools assembled, begin following your chosen plans precisely. Most plans break down the construction into manageable steps, often with accompanying diagrams or photos. Take your time, and don't rush. Precise cuts and accurate assembly are critical for safety. Double-check measurements at each stage; using a square to ensure right angles is particularly important. Follow the instructions meticulously regarding the application of wood glue and the tightening of screws or other fasteners. Always prioritize safety and wear appropriate personal protective equipment (PPE).

Finishing Touches and Safety Checks

After assembling the crib, thoroughly sand all surfaces to a smooth finish, paying attention to any sharp edges or corners. Apply a child-safe finish â€" non-toxic paint or varnish is essential to prevent any harmful chemicals from coming into contact with your baby. Once the finish is dry, perform a rigorous safety check. Ensure all joints are secure, screws are tightened, and the crib meets all relevant safety standards, including slat spacing regulations. Consult the crib safety standards in your country or region; these standards outline crucial dimensions and spacing to prevent entrapment hazards.

Building a crib is a rewarding experience, culminating in a handcrafted piece that will be cherished for years. Remember, patience and meticulous attention to detail are key to ensuring a safe and sturdy crib for your little one. Enjoy the process, and celebrate the accomplishment of creating a beautiful and functional heirloom.

Build a sleek contemporary bed with free woodworking plans

Build Your Dream Bed: Sleek Contemporary Design with FREE Plans!

Hey there, fellow DIY enthusiasts! Are you tired of staring at boring, mass-produced furniture? Do you dream of a bedroom that reflects your unique style and, let's be honest, your killer woodworking skills? Then you've come to the right place! I'm going to walk you through building a stunning contemporary bed â€" sleek, minimalist, and totally customizable â€" using free woodworking plans. Get ready to impress yourself (and everyone else!).

Why Build Your Own Bed?

Before we dive into the nitty-gritty, let's talk about why building your own bed is such a fantastic idea.

First off, the satisfaction is unmatched. There's nothing quite like creating something beautiful and functional with your own two hands. It's a project that will challenge you, teach you new skills, and leave you with a profound sense of accomplishment.

Secondly, you have complete control over the design. Want a king-size platform bed with hidden storage? Go for it! Prefer a queen-size frame with a low profile? You got this! This is your chance to create a bed that perfectly fits your space and your aesthetic.

Thirdly, it's often more affordable than buying a comparable piece from a store. While you'll need to invest in materials, you'll avoid the hefty markup associated with retail furniture.

Finally, it's uniquely yours. No one else will have a bed exactly like it. It's a statement piece, a reflection of your personality and craftsmanship.

The Sleek Contemporary Bed Design: An Overview

This plan focuses on a platform bed â€" a simple, elegant design that's easy to build, even for intermediate DIYers. We’ll avoid overly complex joinery, focusing on clean lines and a modern aesthetic. Think low profile, straight lines, and a focus on quality materials.

Key Features:

  • Minimalist design with clean lines.
  • Solid wood construction for durability and beauty.
  • Platform base for a modern look and feel (no box spring needed!).
  • Easily customizable to fit your desired dimensions.
  • Simple joinery techniques for manageable construction.

Materials You'll Need

This list is a guideline. Adjust quantities based on your bed size (queen, king, etc.). Remember to check your local lumber yard for the best deals!
  • Wood: Consider sturdy hardwood like oak, maple, or walnut for a luxurious feel. Pine or a similar softwood is a more budget-friendly option. You’ll need enough for the bed frame (side rails, head and foot boards, and slats).
  • Wood Glue:** Essential for strong, lasting joints.
  • Wood Screws:** Choose screws appropriate for your wood type. Pre-drilling pilot holes is highly recommended to prevent splitting.
  • Sandpaper:** Various grits (e.g., 80, 120, 220) for smoothing surfaces.
  • Wood Finish:** Choose a finish that complements your wood and personal style. Options include stain, paint, or a clear sealant.
  • Measuring Tape, Pencil, Square, Level:** Essential for accurate cuts and assembly.
  • Safety Glasses and Dust Mask:** Always prioritize safety!
  • Optional: Wood filler for patching any imperfections.

Step-by-Step Construction (Simplified Outline)

(Note: Detailed plans with precise cuts and diagrams will be provided in the downloadable PDF â€" coming soon!) This is a general outline to give you an idea of the process.

Step 1: Cut the Wood

Carefully measure and cut the wood according to the plans. Accuracy is key here! Use a miter saw or circular saw for clean cuts. Don't rush this stage.

Step 2: Assemble the Side Rails

Attach the legs to the side rails using wood glue and screws. Ensure everything is square and level.

Step 3: Attach the Headboard and Footboard

Connect the headboard and footboard to the side rails. Again, use wood glue and screws for a strong, secure connection.

Step 4: Install the Slats

Evenly space the slats across the frame, creating a supportive platform for your mattress.

Step 5: Sand and Finish

Sand all surfaces thoroughly, starting with coarser grits and progressing to finer ones. Apply your chosen finish, following the manufacturer's instructions. Allow ample drying time between coats.

Customize Your Design!

This is where the fun really begins! You can personalize this bed in countless ways:
  • Add Built-in Storage:** Incorporate drawers or shelves into the frame.
  • Unique Headboard:** Create a headboard with a unique shape or material (upholstered, reclaimed wood, etc.).
  • Integrated Lighting:** Add subtle LED lighting under the bed or into the headboard for a modern touch.
  • Different Wood Species:** Experiment with different wood types to achieve different looks and textures.
  • Custom Dimensions:** Adjust the dimensions to perfectly fit your mattress and bedroom.

Downloadable Plans (Coming Soon!)

I'm currently finalizing the detailed woodworking plans with diagrams and precise measurements. These plans will be available as a free PDF download on [link to download will go here once ready]. Stay tuned!

Frequently Asked Questions (FAQs)

Q: What level of woodworking experience is required?

A: This project is suitable for intermediate DIYers. Some basic woodworking knowledge is helpful, but the design focuses on simple joinery techniques.

Q: How long will it take to build?

A: The build time varies depending on your experience and the complexity of your design. Expect to spend several days to a week, working in manageable chunks.

Q: Can I use different types of wood?

A: Absolutely! The choice of wood is entirely up to you. Hardwoods offer durability and a luxurious look, while softwoods are more budget-friendly.

Q: What kind of finish should I use?

A: Many finishes are suitable, including stains, paints, and clear sealants. Consider your personal preferences and the overall style of your bedroom.

Q: What if I make a mistake?

A: Don't worry, everyone makes mistakes! Wood filler can be used to patch minor imperfections. Remember, it's a learning process.

I'm really excited for you to embark on this project! Building your own bed is a rewarding experience, and the result will be a beautiful, unique piece of furniture you'll cherish for years to come. Check back soon for the downloadable plans! Happy building!

Backyard 16x20 pergola construction plans for shade

Building Your Dream 16x20 Backyard Pergola: A Comprehensive Guide

Transform your backyard into a shaded oasis with a stunning 16x20 pergola! This detailed guide walks you through every step, from planning and design to construction and finishing touches. Get ready to enjoy the cool shade and elegant ambiance of your very own pergola, perfect for relaxing, entertaining, or simply enjoying the outdoors.

Planning and Design: Laying the Foundation for Success

Before you even pick up a tool, careful planning is key. Start by determining the exact location of your pergola. Consider factors like sunlight exposure throughout the day, proximity to your house, and any existing landscaping. You'll want a level surface for optimal stability and aesthetic appeal. Next, finalize your design. Will it be attached to your house or freestanding? What style do you prefer â€" classic, modern, rustic? Sketch your vision, noting dimensions and materials. A 16x20 pergola is substantial, so visualize its footprint in your yard. Ensure it complements, rather than clashes with, your home's architecture and landscaping. Finally, obtain any necessary permits from your local authorities before beginning construction. This crucial step ensures you're complying with local building codes and avoids potential future problems.

Materials and Tools: Gathering Your Arsenal

Choosing the right materials is crucial for both the longevity and aesthetic appeal of your pergola. Pressure-treated lumber is a popular and cost-effective choice, offering excellent resistance to rot and decay. However, consider cedar or redwood for a more luxurious look and natural resistance to the elements. For connectors, opt for strong, galvanized steel or stainless steel options for lasting durability. Besides lumber and connectors, you'll need concrete for your footings (if freestanding), roofing materials (consider a shade cloth, polycarbonate panels, or even wooden slats), and fasteners. Gather all your tools beforehand, including a post hole digger, level, measuring tape, saw (circular saw or hand saw), drill, and appropriate safety gear. A comprehensive list will streamline your construction process, minimizing interruptions for material acquisition.

Essential Tool List:

  • Post hole digger
  • Level (both a standard level and a laser level are recommended)
  • Measuring tape
  • Circular saw or hand saw
  • Drill with various drill bits
  • Safety glasses
  • Work gloves
  • Shovel
  • Hammer
  • Post anchors (if necessary)

Construction: Building Your Shaded Sanctuary

Begin by setting your posts. If building a freestanding pergola, dig holes approximately 2-3 feet deep, depending on your location's soil conditions and local building codes. Set the posts in concrete footings for maximum stability. Ensure the posts are perfectly plumb and level using your level. For an attached pergola, secure the posts directly to your house's structure, ensuring proper support and load distribution. Then, connect the beams across the posts. Use your chosen connectors for strength and accuracy, maintaining levelness throughout. Install the rafters, connecting them to the beams to create the pergola's frame. Pay close attention to spacing for consistent shade coverage and visual appeal. Once the frame is complete, consider adding decorative elements like latticework or climbing plants to enhance the overall aesthetics.

Finishing Touches: Adding the Final Flourishes

After constructing the frame, install your chosen roofing material. Shade cloth offers a lightweight and budget-friendly option, while polycarbonate panels provide more robust weather protection. Wooden slats offer a more rustic and natural aesthetic. Once the roofing is in place, consider adding additional elements to personalize your pergola. String lights, potted plants, or outdoor furniture can transform your pergola into a relaxing retreat or an inviting entertainment area. Remember to regularly maintain your pergola by cleaning it and treating the wood to protect it from the elements, ensuring years of enjoyment.

With careful planning, diligent construction, and the right finishing touches, your 16x20 backyard pergola will become a beloved feature of your home, offering a shady sanctuary for years to come.

DIY wall shelf ideas for efficient home organization

Unleash Your Inner DIYer: Awesome Wall Shelf Ideas for a Super Organized Home!

Hey there, fellow organization enthusiasts! Are you tired of clutter taking over your precious living space? Do you dream of a home where everything has its place, looking neat and tidy? Well, grab your tools and let's dive into the wonderfully rewarding world of DIY wall shelves! Building your own shelves is not only incredibly satisfying, but it’s also a fantastic way to customize your storage to perfectly fit your needs and style. Plus, you’ll save a ton of money compared to buying pre-made ones. Let’s get started!

Choosing the Right Materials: A Foundation for Success

Before you even think about hammering a nail, you need to pick your materials wisely. This is where you get to unleash your creativity! The beauty of DIY is that you’re not limited to just wood.

The Classic: Wood Shelves

Wood is a timeless choice for a reason. It's versatile, relatively easy to work with (depending on your skill level!), and comes in a huge range of styles and finishes. From rustic reclaimed wood for a farmhouse vibe to sleek, modern pine, you can find the perfect wood to match your decor. Remember to consider the weight capacity you need â€" thicker boards are better for heavier items.

Pro-Tip: Check your local lumber yard or even salvage shops for unique wood pieces that add character to your shelves. You might even find some amazing deals!

Industrial Chic: Metal Shelves

If you’re going for a more industrial or minimalist look, metal shelves are a fantastic option. You can find pre-cut metal shelving at most hardware stores, or get more creative with pipes and fittings for a truly unique design. Just be sure to use the correct size screws and bolts for secure mounting.

Unexpected Elegance: Repurposed Materials

This is where things get really fun! Think outside the box (literally!). Old ladders, vintage crates, or even repurposed pallets can be transformed into stunning and unique wall shelves. A little sanding, painting, and some creative placement can turn discarded items into stylish storage solutions.

Designing Your Dream Shelves: Size, Style, and Placement

Now for the fun part â€" planning your shelves! This involves considering a few key things:

  • Size and Number of Shelves: How much space do you need? How many items do you need to store? A simple sketch can help you visualize the best arrangement.
  • Shelf Depth: Consider the size of the items you’ll be storing. Deep shelves are great for books and larger items, while shallower shelves are perfect for displaying smaller objects.
  • Style: Do you want floating shelves for a minimalist look, or more substantial shelves with brackets? This decision will impact both the look and the construction process.
  • Placement: Where will your shelves go? Consider the weight capacity of the wall and any potential obstructions (electrical outlets, etc.).

Easy DIY Wall Shelf Projects: Step-by-Step Guides

Let's get our hands dirty! Here are a couple of easy-to-follow projects to get you started:

Simple Floating Shelves from Scrap Wood

This project is perfect for beginners. You'll need: scrap wood (at least 1 inch thick), screws, wall anchors, a drill, and a saw (if you need to cut the wood to size). Measure, cut, sand, and drill pilot holes in the wood before screwing them securely to the wall anchors. Make sure to use a level to ensure your shelves are perfectly straight!

Rustic Pallet Shelf Transformation

If you're feeling more adventurous, a repurposed pallet can be a showstopper. You’ll need a pallet (ensure it’s properly treated and free of splinters), sandpaper, wood stain or paint, and screws. Sand the pallet thoroughly, then apply your chosen finish. Once it's dry, attach sturdy brackets to the back of the pallet to securely mount it to the wall. Consider adding some decorative elements like rope or metal accents.

Beyond the Basics: Adding Creative Touches

Once you’ve mastered the basics, you can really get creative! Here are some ideas to personalize your DIY shelves:

  • Add lighting: Small LED strip lights can add a dramatic touch, especially for showcasing collectibles.
  • Incorporate plants: Greenery adds life and freshness to any space. Consider adding small potted plants or hanging planters.
  • Use decorative brackets: Don’t underestimate the power of eye-catching brackets! They can add a lot of personality to your shelves.
  • Paint or stain the shelves: A fresh coat of paint or a beautiful wood stain can completely transform the look of your shelves.

Safety First: Important Reminders

Before you get started, please remember these important safety tips:

  • Always use appropriate safety gear, such as safety glasses and work gloves.
  • Make sure you're using the correct type of wall anchors for your wall material and the weight of your shelves.
  • Double-check your measurements before drilling any holes.
  • If you're unsure about any part of the process, don't hesitate to seek advice from a more experienced DIYer or a professional.

Commonly Asked Questions

Q: What type of wood is best for DIY shelves?

A: Pine and hardwoods like oak or maple are popular choices. The best type of wood will depend on your budget, desired aesthetic, and the weight of the items you plan to store.

Q: How do I know what kind of wall anchors to use?

A: This depends entirely on your wall type (drywall, plaster, brick, etc.) and the weight of your shelves. Check with your local hardware store for advice, or look online for guidance based on your specific wall material.

Q: What if I mess up?

A: Don't worry! DIY is all about learning and experimentation. Mistakes happen â€" embrace them as learning opportunities. You can always sand down imperfections or repaint the shelves if needed. The most important thing is to have fun and enjoy the process!

Q: Can I build shelves without any experience?

A: Absolutely! Start with a simple project like the floating shelves mentioned above. There are tons of tutorials available online to guide you through the process step by step. Don't be afraid to ask for help if you get stuck!

Happy crafting, and may your shelves be filled with beautiful, organized things!

Affordable floating shelf building instructions for all skill levels

Constructing Affordable Floating Shelves: A Comprehensive Guide

Floating shelves offer a stylish and space-saving solution for displaying books, artwork, or decorative items. This guide provides detailed instructions for constructing affordable floating shelves suitable for individuals of all skill levels, from novice DIY enthusiasts to experienced craftspeople. We will explore various materials and techniques, emphasizing cost-effectiveness and aesthetic appeal.

Choosing Your Materials: A Cost-Effective Approach

The cost of your floating shelf project depends heavily on the materials selected. While high-end hardwoods can produce stunning results, they come with a significant price tag. This guide focuses on achieving a professional finish at a budget-friendly price point. Consider the following options:

Wood Selection

Pine is an excellent choice for beginners due to its affordability, ease of working with, and readily available sizes. Fir is another softwood offering similar advantages. If you desire a more robust and durable shelf, melamine-coated particleboard or MDF (medium-density fiberboard) offers a cost-effective solution with a smooth, paintable surface. While not as aesthetically pleasing as natural wood, proper finishing techniques can mask the material's texture and create a polished appearance.

Hardware Selection

The choice of hardware significantly impacts the shelf's structural integrity and aesthetic. Heavy-duty shelf brackets are crucial, especially for longer shelves or those carrying heavier items. While hidden brackets offer a cleaner, more modern aesthetic, exposed brackets can contribute to a rustic or industrial design. Consider the weight capacity of the brackets and choose accordingly. For concealed brackets, heavy-duty screws capable of holding the weight are essential.

Finishing Materials

The finishing touches can greatly enhance the appearance of your floating shelf. Wood stain adds depth and color to natural wood, while paint offers a more modern and customizable look. For protection against moisture and scratches, a clear coat sealant or polyurethane is highly recommended.

Beginner-Friendly Floating Shelf: A Step-by-Step Guide

This section details the construction of a simple, yet elegant floating shelf perfect for beginners. This design utilizes readily available materials and straightforward techniques.

Tools Required

  • Measuring tape
  • Pencil
  • Circular saw or hand saw (if cutting wood to size)
  • Drill with appropriate drill bits
  • Screwdriver (Phillips head)
  • Level
  • Sandpaper (various grits)
  • Wood glue (optional)
  • Clamps (optional)

Materials Required

  • One piece of pine, fir, or melamine-coated particleboard (dimensions depending on desired shelf size)
  • Two heavy-duty shelf brackets (rated for the expected weight)
  • Appropriate screws for the brackets and the chosen wood
  • Wood stain or paint (optional)
  • Clear coat sealant or polyurethane (optional)

Construction Process

  1. Measure and Cut: Accurately measure and cut the wood to your desired shelf dimensions. Ensure the cut is straight and clean for optimal aesthetics.
  2. Sanding: Smooth the edges and surfaces of the wood using sandpaper. Start with a coarser grit and gradually move to finer grits for a perfectly smooth finish.
  3. Bracket Placement: Mark the positions for the shelf brackets on the wall, ensuring they are level. Pre-drill pilot holes to prevent wood splitting when driving in screws. Using a level is crucial to ensure the shelf is perfectly horizontal.
  4. Install Brackets: Securely attach the shelf brackets to the wall using the appropriate screws. Ensure they are firmly affixed, and the screws are adequately sunk into the wall.
  5. Attach Shelf: Carefully position the shelf onto the installed brackets. Test the stability before proceeding. For additional stability, consider using wood glue to attach the shelf to the brackets before fully securing it.
  6. Finishing (Optional): Apply wood stain, paint, or a clear coat sealant according to the manufacturer’s instructions. Allow sufficient drying time between coats.

Intermediate and Advanced Techniques

For those with more experience, more complex designs and techniques are possible. These might involve concealed bracket systems, custom-cut shapes, or the incorporation of additional materials such as metal or glass.

Concealed Bracket Systems

Concealed bracket systems require more precise measurements and installation. These brackets are often affixed to the underside of the shelf and into the wall, resulting in a cleaner, more minimalist appearance. Careful planning and precision are key to successful installation. This often involves using specialized brackets and potentially requiring a stud finder to ensure secure installation.

Custom Shapes and Designs

Creating custom shapes requires more advanced woodworking skills, potentially including the use of jigsaws, routers, or even CNC machines. This allows for highly individualized and creative shelf designs, such as curved shelves or shelves with intricate cutouts.

Material Combinations

Combining different materials such as wood and metal, or wood and glass, can add visual interest and complexity. This requires careful consideration of material compatibility and structural integrity. The use of adhesives and specialized fasteners might be necessary.

Safety Considerations

Safety should always be the top priority during any DIY project. Always wear appropriate safety glasses and hearing protection when using power tools. Ensure the wall anchors or screws used are appropriate for the weight of the shelf and the wall material. Never overload the shelf beyond its weight capacity. Always follow the manufacturer's instructions for all tools and materials used.

By following these guidelines, you can successfully construct affordable and aesthetically pleasing floating shelves, enhancing your home's décor and functionality. Remember, patience and attention to detail are key to achieving professional results, regardless of your skill level.

Customizable floating shelf plans for every home style

Customizable Floating Shelf Plans for Every Home Style

Floating shelves offer a versatile and aesthetically pleasing solution for maximizing storage space and enhancing the visual appeal of any room. Unlike traditional shelving units, floating shelves appear to be suspended, creating a sleek and modern look. This article delves into the design and construction of customizable floating shelf plans, catering to a diverse range of home styles, from rustic farmhouse to minimalist modern.

Understanding the Fundamentals of Floating Shelf Design

Before embarking on the creation of your customized floating shelves, it is imperative to understand the fundamental principles governing their design and construction. These principles encompass several key aspects, including material selection, structural integrity, and aesthetic considerations. A well-designed floating shelf seamlessly blends functionality with aesthetics, complementing the overall ambiance of the room.

Material Selection: A Foundation of Durability and Style

The choice of material significantly impacts both the longevity and the aesthetic appeal of your floating shelves. Popular options include:

  • Wood: Offers a classic, versatile look and can be stained, painted, or left natural. Hardwoods like oak and maple provide superior durability, while softer woods like pine offer a more rustic charm.
  • Metal: Provides a modern, industrial feel. Steel and iron are durable choices, while lighter metals like aluminum offer a more contemporary aesthetic.
  • Glass: Creates a sleek, minimalist appearance. Tempered glass is crucial for safety and structural integrity. It's particularly suitable for showcasing decorative items.
  • Concrete: Offers a raw, industrial look and exceptional durability. It is best suited for heavier items and requires careful finishing.

Consider the overall style of your home when selecting your material. A rustic farmhouse would benefit from reclaimed wood, while a minimalist modern space might favor sleek metal or glass.

Structural Integrity: Ensuring Safety and Stability

The structural integrity of floating shelves is paramount. Improperly installed shelves can lead to damage or even injury. Hidden support brackets, securely fastened to wall studs, are essential for ensuring the shelf's stability. The weight capacity of the shelf should be carefully considered, especially when storing heavier items. Always use appropriate fasteners for your chosen material and wall type. Consult a professional if you are unsure about the structural capabilities of your walls.

Aesthetic Considerations: Harmony and Visual Appeal

The aesthetic integration of floating shelves into your home décor is crucial. Consider the following factors:

  • Shelf Depth: Deeper shelves offer more storage space, while shallower shelves create a less imposing look.
  • Shelf Length: The length should be proportional to the wall space and the surrounding décor. Avoid overcrowding the wall.
  • Shelf Placement: Consider the functionality and visual impact of the shelf placement. Grouping multiple shelves can create a visually striking focal point.
  • Finishing Touches: Staining, painting, or applying a sealant can enhance the appearance of the shelves and protect them from damage.

Customizable Floating Shelf Plans for Diverse Home Styles

This section outlines customizable floating shelf plans tailored to different home styles, providing inspiration and practical guidance for your projects.

Rustic Farmhouse Floating Shelves

For a rustic farmhouse aesthetic, utilize reclaimed wood with visible knots and imperfections. Consider using a dark stain or leaving the wood natural to enhance the rustic charm. The shelves can be relatively thick and wide, providing ample storage space for decorative items, books, and plants. Use simple, wrought iron brackets for a touch of rustic elegance. Consider adding a distressed finish to further amplify the aged look.

Minimalist Modern Floating Shelves

A minimalist modern approach calls for clean lines, simple forms, and a neutral color palette. Opt for sleek materials like glass or painted MDF (Medium-Density Fiberboard). The shelves should be relatively thin and unobtrusive. Hidden brackets are crucial for maintaining the minimalist aesthetic. Choose a simple, geometric design, and avoid excessive ornamentation.

Mid-Century Modern Floating Shelves

Mid-century modern style is characterized by clean lines, tapered legs, and a blend of natural and manufactured materials. For floating shelves, use solid wood with a mid-tone stain or lacquer finish. The shelves can be slightly thicker than minimalist designs, but still maintain a streamlined look. Select simple, integrated brackets or concealed supports. Consider incorporating warm wood tones and a touch of brass hardware for an authentic touch.

Bohemian Floating Shelves

Bohemian style embraces eclecticism, texture, and a vibrant color palette. Use a mix of materials, such as wood, metal, or even macrame hangers for a unique look. The shelves can be various sizes and shapes, creating an asymmetrical and visually engaging display. Incorporate vibrant colors, patterns, and textures to reflect the bohemian aesthetic. Don't be afraid to mix and match styles and materials for a truly unique design.

Step-by-Step Guide to Installing Floating Shelves

Regardless of your chosen style, the installation process generally follows these steps:

  1. Plan and Measure: Carefully measure the wall space and determine the optimal shelf placement and size.
  2. Locate Studs: Use a stud finder to locate wall studs for secure mounting. This is crucial for ensuring the shelf's stability.
  3. Prepare the Shelves: Sand and finish the shelves according to your chosen style and material.
  4. Attach Brackets: Securely attach the shelf brackets to the wall studs using appropriate fasteners. Ensure the brackets are level and securely fastened.
  5. Mount the Shelves: Carefully position the shelves onto the brackets and ensure they are level and stable.
  6. Inspect and Adjust: Inspect the installation for stability and make any necessary adjustments.

Disclaimer: Always consult a professional if you are unsure about any aspect of the installation process, particularly if dealing with heavy shelves or complex wall structures. Safety should always be the primary concern.

Creating customizable floating shelves offers a rewarding experience that allows you to personalize your home's décor while maximizing storage space. By carefully considering material selection, structural integrity, and aesthetic considerations, you can design and install floating shelves that perfectly complement your home style and enhance its overall ambiance. Remember to always prioritize safety and consult professional help when needed.

Saturday, January 18, 2025

Modern woodworking furniture plans

Modern Woodworking Furniture Plans: A Comprehensive Guide

The allure of handcrafted furniture persists in the modern era, driven by a desire for unique pieces reflecting individual style and a growing appreciation for sustainable materials. This guide delves into the world of modern woodworking furniture plans, exploring design aesthetics, material selection, construction techniques, and the resources available to aspiring woodworkers of all skill levels. We will examine the process from initial conceptualization to the final finishing touches, offering a comprehensive overview for both beginners and experienced craftspeople.

Design Aesthetics in Modern Woodworking

Modern woodworking furniture plans often prioritize clean lines, minimalist forms, and a focus on functionality. Unlike more ornate styles, the emphasis is on showcasing the natural beauty of the wood itself, minimizing embellishments, and creating pieces that seamlessly integrate into contemporary living spaces. Key characteristics include:

Minimalist Design Principles

Modern designs frequently utilize simple geometric shapes, avoiding unnecessary curves or intricate details. The overall effect is one of understated elegance, where the quality of the materials and the precision of the craftsmanship speak for themselves. This approach ensures the piece remains timeless, resisting the fleeting trends of fast fashion.

Emphasis on Natural Materials

The choice of wood is paramount. Sustainable and ethically sourced hardwoods such as walnut, oak, maple, and cherry are favored for their durability, rich grain patterns, and ability to age gracefully. The natural variations in color and texture are embraced rather than hidden, contributing to the unique character of each piece.

Integration of Functionality and Form

Modern furniture isn't merely decorative; it serves a practical purpose. Plans are meticulously crafted to ensure not only aesthetic appeal but also optimal ergonomics and efficient use of space. Every element serves a function, eliminating superfluous details and maximizing practicality.

Material Selection and Sourcing

The success of any woodworking project hinges on the quality of the materials. Selecting the right wood requires careful consideration of its properties, availability, and sustainability.

Hardwood vs. Softwood

Hardwoods, from deciduous trees, are generally denser, more durable, and more resistant to wear and tear, making them ideal for furniture that will endure daily use. Softwoods, from coniferous trees, are lighter, easier to work with, but less durable and more susceptible to dents and scratches. The choice depends on the intended use and the desired aesthetic.

Sustainability and Ethical Sourcing

Increasingly, environmentally conscious woodworkers are prioritizing sustainable forestry practices. Seeking out lumber certified by organizations like the Forest Stewardship Council (FSC) ensures that the wood comes from responsibly managed forests. This commitment to sustainability extends beyond the wood itself to include finishes and other materials used in the construction process.

Understanding Wood Properties

Different hardwoods possess unique characteristics influencing their suitability for specific applications. For example, walnut is known for its rich, dark color and beautiful grain patterns, while maple offers a lighter, more uniform appearance. Oak is renowned for its strength and durability, making it ideal for structural elements. Understanding these nuances is crucial for selecting the optimal wood for a given project.

Construction Techniques and Tools

Modern woodworking utilizes a range of techniques and tools, from traditional hand-craftsmanship to advanced power tools. The specific approach depends on the complexity of the design and the skill level of the woodworker.

Joinery Techniques

Strong and visually appealing joints are essential for the structural integrity and longevity of furniture. Common techniques include:

  • Mortise and tenon joints: These robust joints are ideal for strong, lasting connections.
  • Dovetail joints: Known for their beauty and strength, these interlocked joints are often used in drawers and casework.
  • Biscuit joints: These simpler joints, using oval-shaped biscuits, are suitable for less demanding applications.
  • Dowel joints: Relatively simple to create, dowel joints are useful for quick assembly.

Power Tools and Their Applications

Power tools significantly enhance efficiency and precision in woodworking. Essential tools include:

  • Table saw: For accurate ripping and crosscutting of lumber.
  • Planer: For smoothing and surfacing boards to a uniform thickness.
  • Jointer: For creating perfectly flat and straight edges.
  • Router: For creating various profiles, grooves, and shaping details.
  • Sanding tools (orbital sander, belt sander): For achieving smooth, even finishes.

Hand Tools and Their Importance

Despite the prevalence of power tools, hand tools remain crucial for fine woodworking and intricate detailing. Chisels, hand planes, and saws provide precision and control that power tools often lack, especially in tight spaces or when working with delicate details.

Finding and Utilizing Modern Woodworking Plans

Numerous resources provide access to modern woodworking furniture plans, catering to various skill levels and design preferences.

Online Resources and Digital Plans

Websites, blogs, and online marketplaces offer a vast collection of digital plans, often with detailed instructions, diagrams, and material lists. Many plans are available for download, allowing for immediate access to project information.

Woodworking Magazines and Books

Traditional woodworking magazines and books remain valuable resources, providing inspiration, detailed instructions, and insights into techniques and materials. These publications often feature plans for a range of furniture styles, from simple projects to more complex designs.

Custom Design and Commissioned Work

For those seeking truly unique pieces, commissioning a custom design from a skilled woodworker can be an excellent option. This allows for personalized designs tailored to specific needs and preferences, resulting in a one-of-a-kind piece of furniture.

Finishing Touches and Preservation

The final stages of the project are just as crucial as the construction. Proper finishing protects the wood, enhances its appearance, and contributes to the longevity of the furniture.

Sanding and Surface Preparation

Thorough sanding is essential to achieve a smooth surface for the finish. Multiple grits of sandpaper, starting with coarser grits and progressively moving to finer ones, ensure a flawless base for the finish.

Choosing the Right Finish

The type of finish depends on the desired aesthetic and the intended use of the furniture. Options include oil finishes, varnish, lacquer, and shellac, each offering different levels of protection and sheen.

Maintaining and Preserving Your Furniture

Regular cleaning and occasional reapplication of finish can help preserve the beauty and durability of handcrafted furniture for generations to come. Avoiding exposure to direct sunlight and excessive moisture contributes to its longevity.

In conclusion, crafting modern woodworking furniture is a rewarding endeavor, blending artistic expression with practical skill. By carefully selecting materials, employing appropriate techniques, and utilizing available resources, aspiring woodworkers can create beautiful, functional pieces that enrich their living spaces and serve as lasting testaments to their craftsmanship.

Friday, January 17, 2025

Eco-Friendly Wooden Box DIY Ideas for Sustainable Living

Eco-Friendly Wooden Box DIY Ideas for Sustainable Living

Tired of plastic containers cluttering your home and contributing to environmental waste? Embrace a sustainable lifestyle by crafting your own eco-friendly wooden boxes! This engaging DIY project not only reduces your environmental impact but also allows you to personalize storage solutions to perfectly fit your needs. From repurposing reclaimed wood to adding creative touches, discover the joy of building beautiful, functional, and environmentally conscious storage.

Choosing Your Wood: Sustainability Starts at the Source

The heart of an eco-friendly project lies in responsible material sourcing. Opt for reclaimed wood whenever possible. This gives old lumber a new life, diverting it from landfills and reducing the demand for newly harvested timber. Think creatively! Look for discarded pallets, old furniture destined for the trash, or even salvaged wood from construction sites. Thoroughly clean and sand your reclaimed wood to prepare it for your project. If buying new wood, choose sustainably harvested options certified by organizations like the Forest Stewardship Council (FSC). This certification ensures responsible forestry practices, protecting forests for future generations. Consider the type of wood; hardwoods like oak or maple offer durability but are more expensive, whereas softwoods like pine are more affordable but may require more care.

Simple Wooden Box Designs for Beginners

The Classic Crate

This project is perfect for beginners. Start by cutting your chosen wood into identical pieces for the sides, top, and bottom. Use a miter saw for precise cuts. Assemble the sides using strong wood glue and reinforce with small nails or screws. Finally, attach the top and bottom pieces, ensuring all joints are tight and secure. Sand the box thoroughly to remove any rough edges and apply a natural oil or wax finish for protection and a beautiful sheen. This basic design can be easily adapted; increase the size for larger storage needs, or leave the top open for a rustic feel.

The Decorative Lidded Box

Elevate your storage game with a lidded box. This design builds upon the classic crate, adding a separate piece for the lid. You can create a simple hinged lid using hinges made from recycled metal or even strong twine. Remember to create a snug fit between the lid and the box. Once again, sanding and finishing are key. Experiment with different stains or paints for a personalized look. Add decorative elements, like etched designs, painted patterns, or small knobs for a unique touch.

Adding Creative Touches: Personalize Your Eco-Friendly Storage

Personalization is where your wooden box truly shines! Your creativity is the limit. Consider these ideas to add a personal touch:

  • Inlay work: Use contrasting pieces of wood to create intricate patterns or designs.
  • Burned designs: Employ a wood-burning tool to add artistic flourishes.
  • Stencils and paint: Create beautiful patterns and designs using stencils and eco-friendly paints.
  • Upcycled hardware: Add unique handles, hinges, or latches made from repurposed materials like old keys or buttons.
  • Natural embellishments: Decorate with dried flowers, pressed leaves, or small pieces of driftwood for a rustic aesthetic.

Remember to always prioritize eco-friendly finishes and embellishments. Choose natural oils, waxes, or water-based paints to avoid harmful chemicals.

Beyond Storage: Expanding Your Wooden Box Creations

The versatility of wooden boxes extends beyond simple storage. Consider crafting specialized boxes for specific uses. A small, intricately designed box could hold cherished jewelry. A larger, sturdy box might serve as a planter for herbs or succulents. Get creative and let your imagination run wild! The possibilities are endless, and each project contributes to a more sustainable and stylish home.

Decorative DIY Wooden Bread Box Ideas for Kitchen Style

Unleash Your Inner Artisan: Stunning DIY Wooden Bread Box Ideas

Tired of those bland, plastic bread boxes cluttering your countertop? Yearning for a touch of rustic charm or modern elegance in your kitchen? Then it's time to roll up your sleeves and embrace the rewarding world of DIY! Crafting your own wooden bread box offers a fantastic opportunity to personalize your kitchen and showcase your creativity. This article explores a variety of styles and techniques, empowering you to build a bread box that perfectly reflects your unique kitchen aesthetic.

Choosing Your Style: Rustic Charm vs. Modern Minimalism

Before you even pick up a saw, decide on the overall style of your bread box. Do you envision a rustic, farmhouse-style piece that exudes warmth and tradition? Or are you aiming for a sleek, minimalist design that complements a contemporary kitchen? Consider the existing décor in your kitchen. A rustic bread box, crafted from reclaimed wood with visible knots and imperfections, will beautifully complement a farmhouse kitchen filled with vintage accents and natural materials. Alternatively, a clean-lined, painted bread box made from smooth, modern plywood will integrate seamlessly into a minimalist or Scandinavian-inspired space. This initial decision will greatly influence your choice of wood, finish, and overall design.

Materials and Tools: Gathering Your Arsenal

The success of your DIY project hinges on having the right tools and materials. For a rustic style, consider reclaimed wood like pallet wood (ensure it's properly treated for food safety!), or readily available pine. For a modern look, plywood or even beautifully grained hardwoods like maple or cherry make excellent choices. Regardless of your wood selection, you'll need essential tools: a saw (circular saw or hand saw), sandpaper (various grits), wood glue, clamps, a measuring tape, a pencil, and appropriate wood finish (stain, paint, or sealant). Don't forget safety gear â€" safety glasses and a dust mask are crucial for protecting yourself from flying debris and wood dust.

Essential Tools for Success:

  • Circular saw or hand saw
  • Sandpaper (various grits)
  • Wood glue
  • Clamps
  • Measuring tape
  • Pencil
  • Wood finish (stain, paint, or sealant)
  • Safety glasses
  • Dust mask

Design Ideas: Unleashing Your Creativity

The beauty of a DIY project lies in its customization. Let's explore a few inspiring ideas to spark your imagination. For a rustic bread box, consider incorporating decorative elements like metal hinges, a simple wooden latch, or even a hand-painted design. You might even add a small chalkboard panel to the top for writing messages or jotting down your shopping list. For a modern aesthetic, clean lines and simple geometric shapes are key. Consider incorporating sleek metal handles or opting for a minimalist, unadorned design that lets the beauty of the wood shine through. Experiment with different staining techniques to achieve a unique finish. Perhaps a two-tone design or a subtle, distressed effect? The possibilities are truly endless!

Finishing Touches: Adding the Personal Sparkle

Once your bread box is assembled and sanded smooth, the finishing touches are what truly elevate it from functional to fabulous. Choose a wood finish that complements your style. A clear sealant will protect the wood and highlight its natural grain, while stains can add depth and warmth. Paint offers endless possibilities for color customization, allowing you to match the bread box to your kitchen's color palette. Consider adding stencils for a more intricate design or simply applying a few coats of your favorite color for a clean and modern look. Remember to apply the finish in a well-ventilated area and follow the manufacturer's instructions carefully for best results.

Building your own wooden bread box isn't just about creating a functional storage solution; it's about infusing your kitchen with personality and warmth. So grab your tools, unleash your creativity, and enjoy the immensely satisfying process of crafting a beautiful, handcrafted piece that you'll cherish for years to come.

Rustic Wooden Box DIY Ideas for Home Furniture

Unleash Your Inner Craftsperson: Rustic Wooden Box DIY Furniture Ideas

Transform ordinary wooden boxes into extraordinary pieces of home furniture with these inspiring DIY projects. Forget mass-produced furniture; inject your personality and create unique, rustic charm throughout your living space. These projects are perfect for beginners and seasoned DIY enthusiasts alike, offering a rewarding blend of creativity and practicality. Get ready to upcycle, repurpose, and personalize your home with these stunning wooden box creations!

Rustic Coffee Table with Hidden Storage

Imagine a charming coffee table that not only boasts rustic appeal but also offers ample hidden storage. This project starts with several sturdy wooden crates, preferably with varying heights for added visual interest. Begin by sanding down each crate to achieve a smooth, consistent surface. Then, stain or paint the crates to your desired color paletteâ€"consider a warm, honey-toned stain for a truly rustic look, or a vibrant color for a more modern feel. Securely attach the crates to each other using wood glue and screws, creating a stable base and a tiered effect. Finally, add casters to the bottom for easy mobility. Voila! A beautiful and functional coffee table that hides away remotes, books, and blankets.

Tips for Success:

  • Use strong wood glue and screws for maximum stability.
  • Pre-drill pilot holes to prevent wood splitting.
  • Sand thoroughly between coats of stain or paint for a smooth finish.

Rustic Nightstands: A Touch of Farmhouse Charm

Give your bedroom a cozy upgrade with these easy-to-make rustic nightstands. Select two similar-sized wooden crates that possess the desired rustic characterâ€"consider using reclaimed wood for an authentic feel. Clean and sand the crates to prepare them for finishing. Apply a coat of your preferred stain or paint; a distressed white paint finish paired with rustic hardware would add a touch of farmhouse elegance. Once dry, attach sturdy legs to the bottom of each crate for added height and stability. Consider adding a small drawer or shelf to maximize storage. These functional nightstands will instantly enhance the ambiance of your bedroom while offering a convenient place for your bedtime essentials.

Choosing the Right Hardware:

Select hardware that complements your chosen style. Antique-style knobs or pulls will enhance the rustic aesthetic while modern, minimalist handles can create a more contemporary feel. Consider using cup pulls for a unique touch.

A Unique Bookshelf from Repurposed Boxes

Transform a collection of wooden boxes into a striking and unconventional bookshelf. This project invites creativity and personalization. Gather boxes of various sizes and shapes â€" the more variety, the more visually interesting the final product becomes. Sand each box meticulously to achieve a smooth surface, then apply your chosen finishâ€"a natural wood stain showcases the grain beautifully, while a painted finish allows for endless color customization. Attach the boxes to a sturdy backing board using wood glue and screws, arranging them in an aesthetically pleasing pattern. Consider adding a decorative top and bottom trim for a polished look. This unique bookshelf will be a conversation starter and a functional addition to any room.

Get Creative with Arrangement:

Don't be afraid to experiment with different box arrangements. Overlapping boxes or a staggered pattern can create a dynamic and visually appealing bookshelf. Use your imagination!